Wednesday, August 6, 2008

Week 10 - DONE!


Its done and here are the final pictures. I have been using it now for a week and while it look a bit longer to get finished, I am thrilled with the final result!


Sunday, July 13, 2008

Week 9+ The finishing touches, Part II

We are still waiting on the door to arrive, but here are some additional finishing touches pictures of the bathroom. I am very excited to finally get in it!

I saw on a TV show the idea for these niches in the wall, for extra storage, and Jason and I added them as a last minute addition...


The shower is all set up and waiting on the glass door to arrive!!!

I hung some art on the walls....these were industrial "dyes" used to make large machine parts back in the 40's and 50's. I found them at a antique store...


I put wire baskets under my sink to give me more storage....

Any day now!

Monday, June 9, 2008

Week 8 - Finishing Touches Started!

They say Rome wasn't built in a day, and the same could be said for this bathroom remodel. After many weeks of dust, demolition and dally, things are really starting to take shape. This weekend, Jason completed the grouting of the tile and has started to install fixtures. It's really starting to look good!

Tiling has been grouted - still needs to be sealed - but you can see where the shower handle is - the top is for the temperature selection, the bottom is for the water pressure.


The mirror and lights are up - and on a dimmer - - the lighting looks very nice!!!
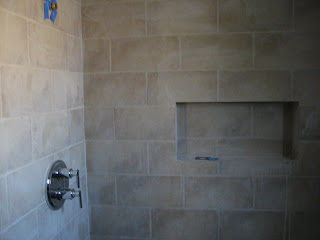


I stepped back to get a final shot of the shower - - the shower head is going in this week - - VERY exciting!!!

Wednesday, May 28, 2008

Week 7 - TILING DONE! Panoramic View

Jason (of Z Construction) finished tiling tonite and I went in and tried to do a panoramic view of the shower, from the front....if things look crooked, its the fact that I merged 3 photos to get this view...


More is to come this weekend - - walls get finished and fixtures will start to be put up!!!

Thursday, May 22, 2008

Week #5,6 - - Tiling!

Hey everyone - - sorry for being out of pocket - a few explanations here... my fabulous contractor has a few planned weeks off and is now back in pocket and did all the tiling over the last two weekends.....and here it is...we are getting close to finish!


Jason still has the grouting to do, but we are getting there!

Wednesday, April 23, 2008

Shameless Product Placement #4 - Lighting

Here is the Robert Abbey lighting we(sic)* are putting on either side of the mirror above the sink.
*Upon sharing this post with my boss, I was reminded that I am no longer a we, that I am an I. Thanks for rubbing it in


I will also share pictures of the sink and mirror and what I think the overall look will be:

Ok - so use your imagination a little - the cabinet to the left of the sink will not be there....

Week 4 - Its Electric!

Week Four brought about exciting updates and installations of all things electric. The pictures don't really do it much justice, but here is what we got done....

#1 - Recessed lighting over the shower installed....


#2 - Light boxes for the lighting on either side of the mirror installed (more to come on what the lighting will look like)

#3 Jason (of Z Construction) relocated all of the outlets and switches to one central location. He wanted me all to note that he did this as an "extra" as part of the job and a reflection on what a good contractor he is. Thanks Jason! Score one for the little guys...


#4 I put the speaker plates on. This took about 20 seconds. This was my contribution to the weekend.


More to come on "products" that will go in these lovely electrical outlets including lighting and the Whisperwarm fan!

Tuesday, April 15, 2008

Shameless Product Placement #3

Since I got a question about it from my lovely cousin (shout out to you Todd), I figured I would put a quick entry about the showerhead that eventually will be installed, and product placement #3. My lovely contractor Jason (of Z Construction) recommended that I use Grohe products, so the showerhead, handles and thermostat valve all come from Grohe. Nice.

This is the Grohe Freehander shower. Pretty cool, right? It has two showerheads, each fully 360 pivotable and the "arm" swings up and down. Sure to be enjoyed!


Monday, April 14, 2008

Week 3, Part II - Shower all framed in!

Well, it was a big moment this weekend. Jason (of Z Construction) completed another "milestone" in the project- the Shower is all framed out. Framing a shower consisted of many steps, including putting up a plastic "vapor barrier" behind the wall, putting up a concrete-like "hardibacker" wall, sealing that wall, framing in the bottom of the shower pan (and lip) and then pouring two levels of concrete, all done perfectly by my wonderful (and lover of all things Judds) contractor and friend Jason (of Z Construction).


One of these days, I will actually show Jason (of Z Construction) to the world, because you might want one of your very own. He's good peeps.


Saturday, April 12, 2008

Week 3, Part I - The Walls Go Up!

Let there be walls! Jason (of Z Construction) just completed walls - - all in the course of a Saturday afternoon. They look great and the shower itself has really started to take form. I am quite excited! More will come tomorrow, with the final layer of the shower floor being poured and the wall to be sealed, but its really starting to come together!


Tuesday, April 8, 2008

Shameless Product Placements #1 and #2

As part of Week 2's progress, two of the first of many fun products were installed by Jason (of Z Construction). Exciting times and I figured I would profile them:

Shameless Placement #1: Grohe Thermostatic Temp Control Valve


Have you ever been taking a shower and have someone either flush or brush their teeth and suddenly (shock!) you are blasted with hot or cold water. No longer. This valve apparently will consistently balance temperature and allow you to set a temperature to assure that you will always have water of the same temperature....nifty, right?

Shameless Product Placement #2

I decided to take the opportunity to grow my BOSE wireless sound network at home and put inset speakers in my bathroom. I actually at first thought this might be a little too much, but I just plugged them in for the first time (we installed them this weekend) and its AMAZING. I might never leave this bathroom.

And with that....I need to get back to work!

Monday, April 7, 2008

Week 2: Plumbing, Electrical and the Shower Floor!

Week 2 of construction was a full one - Jason (of Z Construction) (whom I am now supposed to link every time I say, breathe or think his name) arrived early on Saturday morning with enough construction materials to build a small home - - and they all were staged in my bedroom. Joy!

By the end of the weekend, a considerable amount of progress had been made - - about 1/3 of the materials remain in the bedroom and the bathroom project is starting to take form.

So here is what he got done....

* The shower base was framed, the drainpipe installed and the cement mix (layer 1) that will make the base of the shower was poured. The hardibacker floors were also put down over the existing wood floor.


* The shower niche was built. Jason (of Z Construction) and I had significant conversation over the size and height of the niche. Apparently, I have a considerable amount of shower products and he felt that it needed to be made large enough to accomodate a small family.


* Plumbing fixtures were installed, along with a cut off valve and access door. I previously didn't have any of this, which again is an improvement thought up by Jason (of Z Construction). I will talk more about the shower fixtures in my next post


* Jason (of Z Construction) also ran the speaker wires below the floor and we centralized my BOSE Wireless music network in one central location. Speakers were inset in the opposite wall and installed - they are hidden now, and still has some more dry wall to fix around the speaker, but they are there and tested - - and we have audio in the bathroom- YAY! (Again, more on this later)


So thats week 2 - - ENJOY!!

Friday, April 4, 2008

Week 1: Demolition

Demolition of my bathroom began Saturday, March 29th. My friendly contractor Jason showed up and within a few hours had most of the place destroyed. Nice. I on the otherhand enjoyed a lovely afternoon at Target and Best Buy, wondering what I was going to come home to.....and this is what I saw when I returned.


Step 1: Remove sink, fixtures, toilet.....


Step 2: Removal of all tiles around tub....


Step 3 : All Tile gone.....down to the studs


Step 4: Tub Gone


Jason recommended that I post all of the reuseable items on craigslist and by Sunday the toilet, sink, bathtub and light figures were all taken for free. I guess this is better than putting all of this in landfill. Go Eco-Eddie :-)

Next Week: Electrical Work and Plumbing Changes

I promise it will get more interesting....

Initial View of the Bathroom

Here is the initial view of the bathroom. I for the most part removed my products, shelving and shower curtain before these pictures were taken.


Let the demo begin!!!!


Initial Setup of Blog

Hello Everyone - I've set up this blog to update family and friends on my bathroom remodel project. This project has been a LONG time in the making, with many twists and turns. The remodel is on my "master" bathroom off of my bedroom.

In the coming weeks, I will be posting weekly updates of progress with pictures, stories, trials and tribulations. Hopefully you will enjoy. Hopefully I will not go crazy in the process!